

Have you ever looked at boat in which the interior was full of mildew, or all the cabinets and storage areas had rust stains from rusty tools, canned food and so on? Or the rub rails were all dented with screws popping out or missing, with extensive stress cracking along the toe rails? Or you look up under the forward cabin berths and find puddles of water, water stains and loads of mildew. Or perhaps the liners on the sides of the hull are full of water stains.
If you have, then most likely you've witnessed the effects on a boat that has a leaking hull-to-deck joint. Unfortunately, a lot of boat builders give the manner in which the deck is attached to the hull short shrift because it is quite time-consuming to create a deck joint that is both strong and water tight.
That very large numbers of boats, both large and small, power and sail, have inferior deck joints is probably the result of the fact that the effects of a weak joint don't start showing up until the boat is getting on in years. Here's why:
Most decks are simply attached by means of screws. The deck creates a simple vertical lap joint that fits over the hull much like a shoe box lid. Then they squirt some caulking up in the gap and then just run screws through the two parts, as shown in the illustration below. With a little study of this illustration, it's not hard to see how and why this might become a problem. Fiberglass is just that, silicon glass in the form of fibers set in a matrix of plastic resin. Unfortunately, both these materials are somewhat brittle.
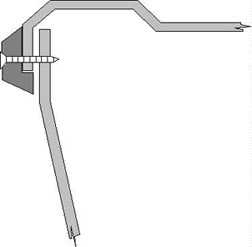
This section view more clearly illustrates why simply screwing a deck onto a hull is not acceptable.
You can imagine what would happen if you tried to drill a hole in a plate glass window and run a screw into it. Well, a laminate of plastic and glass fibers is not a whole lot better in terms of supporting a screw that is subject to impacts and heavy loads, as a deck joint surely is.
It should be readily apparent what happens when the side of the boat bumps up against a piling with even a moderate impact: the threaded screw is going to break right out of the self-tapped threads that is made in the very thin deck and hull side lap. But that's not what happened with the two year old Silverton boat shown in the next photo below. In this boat, the screws in the rub rail, which also hold the deck joint together, have backed out all the way around the bow in places that are not normally subject to impacts. This occurred with about 80% of all the deck joint screws. The only area spared was the transom.
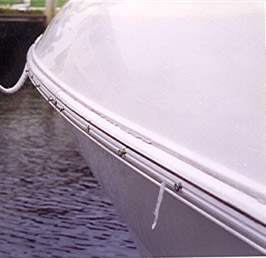
Could a picture be any more convincing than this one? Notice how every screw is backed out. A couple have fallen out completely.
To understand how this could happen, consider what happens when the bottom of the hull slams hard. That impact loading is transmitted right up the hull sides to the deck joint. You can see from the illustration above that this causes the hull side to shear against the screw joint. With repeated shearing loads, this causes the screw hole to elongate and the screws to back out. No amount of caulking is going to cause the deck and hull to hold together, so ultimately the boat starts leaking badly. Which explains how you end up with cabinets that get wet inside, and no one seems to be able to figure out why so much mildew is forming inside. It's all because the builder took the cheap way out and just screwed the hull and deck together. For as effective as that is, the builder might just as well have used a nail gun or Scotch Tape.
Of course, this is only part of the problem that results from this inferior method of attachment. The other is that every time the boat bumps a piling with this deck joint that is no longer securely fastened to the hull, and being that much weaker, every succeeding impact causes more damage. Soon, the rub rails start denting and the toe rail starts cracking from the excessive amount of flexing that is now occurring, all because the structure is progressively weakening.
The next thing you know, the rub rail is falling off. But this never gets fixed properly because the cost is very high, and no one wants to foot that bill. So the unfortunate owner of this boat asks his local boat yard to fix it as cheaply as possible -which is no fix at all - and so the condition year after year gradually worsens. And so does the damage to the interior from all the leakage that continues to occur.
Little by slowly, that nice, shiny, but still quite expensive new boat transitions to an old, beaten up, worn out boat, in a number of years that is far too short, meaning that most likely some mortgage payments still remain.
So how do you avoid getting stuck with a tar baby like this? By looking very closely at how the boat is put together. On most boats you'll be able to get a look at the deck joint in the area of the rope locker or somewhere aft near the transom. But if you don't look, you aren't going to know.
Oh, I know, people have been arguing with me for years about my insistence that decks need a better means of attachment than merely screwing them together. Builders argue that this works just fine. Sure, and how many members of this debating society ever bother to take a look at what happens to their deck joints years later. And, of course, any time there is a problem, they'll blame it on the boat owner for abusing his boat. As if a boat is never supposed to touch a piling. In fact, many boat owners are so conditioned to handle their boats this way because they know that the slightest bump is going to cause damage.
Like the painted, plastic
bumpers of cars, you don't dare touch anything with
them.
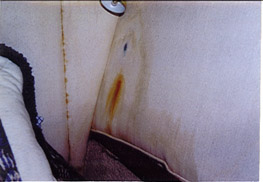
This is typical of the kind of interior damage that occurs from leaking deck joints.
How should a deck be attached? Well, there are different methods with differing degrees of success. The most effective is to laminate over the joint, commonly called a "glassed joint." This not only strengthens the joint, but helps prevent leakage, even after impacts occur. Another effective way is to bolt the deck on, but almost no production builder will do this. That takes two people, instead of one person with a screw gun. A method that a few builders use is to use a wood backing strip glued onto the inside of the deck molding. This provides yet a third member into which the screw is set. Its effect is to act as a clamp, thereby relieving some of the stress on the fiberglass surrounding the screw.
This later method does not, however, prevent leakage, for the glass will still breakdown around the screw hole. However, the potential amount of leakage is much less, usually on the order of drips rather that running streams of water as will happen with a deck joint that has become completely separated.
We would point out that there is no excuse for a builder not at least adopting the later method since it involves very little in the way of extra time and material.
When talking about the quality of a boat, this is one of those hidden factors that makes a world of difference. Be sure not to overlook it.


David Pascoe is a second generation marine surveyor in his family who began his surveying career at age 16 as an apprentice in 1965 as the era of wooden boats was drawing to a close.
Certified by the National Association of Marine Surveyors in 1972, he has conducted over 5,000 pre purchase surveys in addition to having conducted hundreds of boating accident investigations, including fires, sinkings, hull failures and machinery failure analysis.
Over forty years of knowledge and experience are brought to bear in following books. David Pascoe is the author of:
In addition to readers in the United States, boaters and boat industry professionals worldwide from nearly 80 countries have purchased David Pascoe's books, since introduction of his first book in 2001.
In 2012, David Pascoe has retired from marine surveying business at age 65.
On November 23rd, 2018, David Pascoe has passed away at age 71.
Biography - Long version