

People are often baffled by the problem that the typical rotary vane bilge pump (such as Rule) does not remove all the water from the bilge. In fact, most pumps will leave as much as 1-1/2" of water. Plus there is also the matter that the remaining water in the hose when the pump turns off then runs back into the bilge.
Parts Needed
diaphragm pump
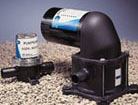
Jabsco - PAR single diaphragm pump

Bilge pump switch
with indicator light
Bronze mushroom
head through hull port with a barbed 90 degree
elbow

Pickup strainer
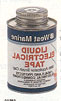
Liquid Electrical Tape
Additional
Reading:
All About
Bilge Pumps
"Those Essential Devices for Keeping Your Boat Off the Bottom"
And no, you should not use a check valve in the bilge pump line to prevent the back flow of water. The use of a check valve is not recommended due to the potential for sticking and causing the pumping system to fail.
On a sail boat with a deep keel sump, that's probably not a problem, but on a power boat where the bilge bottom may be nearly flat, that much water remaining in the bilge can cause big problems. For one thing, when the boat gets up on plane, all that water is likely to go rushing aft where it sloshes and splashes around, causing corrosion damage to other things under the deck that shouldn't get wet.
Further, when the weather is hot, and the sun is beating down on the deck, this causes a high evaporation rate that creates very high humidity in the bilge that can cause other components, especially things like steel pump bodies and generator sets to rust up. Therefore, it's a good idea to remove as much of that water as possible.
Fortunately, there is a solution for this, which is to install a diaphragm pump that is capable of removing nearly all of the water from the bilge. Usually, these can remove up to the final 1/4" of water. For this purpose, we recommend the Jabsco - PAR single diaphragm pump, shown at right top, which is reasonably priced. We like it because it has mostly plastic parts that don't rust, and the diaphragm can easily be replaced. You'll also need to have an inline strainer so that no debris gets into the pump, but fortunately this is provided with the pump.
This is a low capacity pump of only 3.5 gpm. It will do the job just fine, but if you'd prefer, you can choose a pump with higher capacity to use as a reserve or back up bilge pump.
Naturally, this pump has to be operated manually since no float switch can function in an inch of water. Therefore, it gets wired to a manual on/off switch
The installation of such a pump is straightforward. First, you need to determine where is the lowest point in the bilge when the boat is at rest, and where the water will accumulate. This is the point to install the pump and it's remote pickup. The beauty of this type of self-priming pump is that it can be mounted well above the bilge water and out of harm's way of leaking hatches where water might get to it.
Secondly, consider what and where is the best way to route the discharge hose overboard. While it is possible to use existing through hull ports, care must be taken in the manner of accomplishing this so that water does not back flow through any other hose that is connected to the port. The usual method of doing this is to have a riser loop on both discharges and have these hoses routed downward to the hull port. To accomplish this, install a "Y" elbow in the existing line as per the diagram. Note that you can use sink discharge lines with the caveat that you will hear the pumping noise up through the sink drain. But since this is not an automatic pump, but one that will only be used occasionally, that may not be an important consideration.
You can also double up to an existing bilge pump port by the same method. Your existing pump should have a riser loop already in the line, in which case all you need to do is install the "Y" and duplicate the riser for the new discharge line. It's wise to have a riser of at least a 12" above the waterline for power boats.
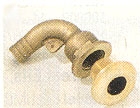
If you're going to put a new hole in the hull, we recommend a bronze mushroom head through hull port with a barbed 90 degree elbow. This will enable you to run the hose upward for your riser loop without having to make a too-sharp bend. If the hull side is cored, you should NOT cut a hole in it unless the builder has provided an uncored area specifically for the installation of through hulls. With a cored hull, it's best to try to double up to your existing bilge pump outlet.
For the riser loop, you MUST find a way to secure the riser loop to the hull. Usually there is no place to attach a holding strap to. Probably the best way to do this is to epoxy glue a small block of plywood -- say 4" x 4" -- to the hull side. Rough up the hull surface with coarse sandpaper first to be sure to get a good bond. After the epoxy has dried, then you can use a ty-wrap to secure the hose in position.
Note: We do not recommend the use of poly hose due to its propensity for collapsing and kinking. We recommend Series 148 Multi-purpose reinforced vinyl hose.
For the wiring, you should use a spare slot on your breaker panel if you have one. If not, you'll have to use an inline fuse, so be sure to place it at a location that it can easily be reached, but also where it's not going to get wet. For the switch, we'd recommend a dedicate bilge pump switch with indicator light, one such as the Rule model 41, 43 or 45. The later two models are three position switches, but do have the benefit of having a built in fuse holder that makes installation easier.
Use #12 wire and standard butt connectors. We recommend the use of Liquid Electrical Tape to seal the connections. Total cost to complete this do-it-yourself job: Approximately $300.00.


David Pascoe is a second generation marine surveyor in his family who began his surveying career at age 16 as an apprentice in 1965 as the era of wooden boats was drawing to a close.
Certified by the National Association of Marine Surveyors in 1972, he has conducted over 5,000 pre purchase surveys in addition to having conducted hundreds of boating accident investigations, including fires, sinkings, hull failures and machinery failure analysis.
Over forty years of knowledge and experience are brought to bear in following books. David Pascoe is the author of:
In addition to readers in the United States, boaters and boat industry professionals worldwide from nearly 80 countries have purchased David Pascoe's books, since introduction of his first book in 2001.
In 2012, David Pascoe has retired from marine surveying business at age 65.
On November 23rd, 2018, David Pascoe has passed away at age 71.
Biography - Long version